
Saturday, November 24, 2007
tiramisu cake
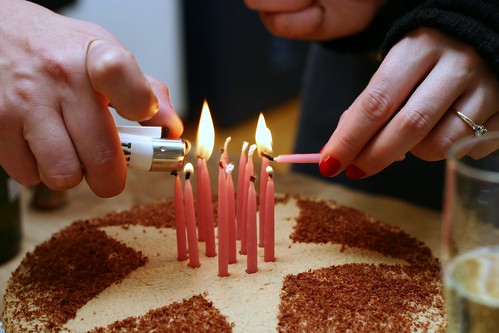
Last Saturday was my darling Jocelyn’s birthday and you just know I wasn’t going to even think about showing up without birthday cake. Fortunately, just about everyone we know agrees that two of the best desserts on earth are cannolis from Venieros on First Avenue and homemade tiramisu. I was actually kind of obsessed with figuring out a way to make a cannoli cake, but in the end copped out, not feeling daring enough to invent a recipe and having waited until the very last minute (3 p.m.) to actually start baking. Not for the first or last time, Dorie Greenspan came to the rescue. As if Baking: From My Home to Yours wasn’t awesome enough, it actually includes two cake sections, one devoted solely to “Celebration Cakes,” or the exact type you’d want to bring to a birthday party. But all are so much more exciting than just yellow cake and butter cream frosting, such as Black and White Chocolate Cake, Big Carrot Cake, Perfect Party Cake and Tiramisu Cake. I stopped right there, and started this:


Which ended up like this:


And was received like this:


I’m very particular about tiramisu, by the way. It’s one of my favorite desserts yet most times I order it, I find it disappointing. Typically, I don’t think there is enough of a recognizable coffee flavor to it. I think it tastes best with marsala or brandy, not Kahlua. Often the tiny cakes are not soaked enough. I think that the chocolate layers should be a bed of almost crinkly shaven very bitter chocolate. This cake, however, knew I was coming and made everything just right. And the guest of honor? It looks like she concurred. I couldn’t be more proud.

[Photo by our friend Lexxie.]
Tiramisu Cake
Baking: From My Home to Yours by Dorie Greenspan
For the cake layers:
2 cups (255 grams) cake flour
2 teaspoons (10 grams) baking powder
1/8 teaspoon baking soda
1/4 teaspoon salt
1 1/4 sticks (10 tablespoons or 140 grams)) unsalted butter, room temperature
1 cup (200 grams) sugar
3 large eggs
1 large egg yolk
1 1/2 teaspoons (8 ml) pure vanilla extract
3/4 cup (175 ml) buttermilk
For the espresso extract:
2 tablespoons instant espresso powder
2 tablespoons (30 ml) boiling water
For the espresso syrup:
1/2 cup (120 ml) water
1/3 cup (65 grams) sugar
1 tablespoon (15 ml) amaretto, Kahlua, or brandy (Deb note: I used brandy)
For the filling and frosting:
1 8-ounce (225 grams) container mascarpone
1/2 cup (60 grams) confectioners’ sugar, sifted
1 1/2 teaspoons (8 ml) pure vanilla extract
1 tablespoon (15 ml) amaretto, Kahlua, or brandy (Deb note: I used brandy)
1 cup (235 ml) cold heavy cream
2 1/2 ounces (70 grams) bittersweet or semisweet chocolate, finely chopped, or about 1/2 cup store-bought mini chocolate chips
Chocolate-covered espresso beans, for decoration (optional)
Cocoa powder, for dusting
Getting ready:
Center a rack in the oven and preheat the oven to 350 degrees F. Butter two 9×2 inch round cake pans, dust the insides with flour, tap out the excess, and line the bottoms of the pans with parchment or wax paper. Put the pans on a baking sheet.
To make the cake:
Sift together the cake flour, baking powder, baking soda, and salt.
Working with a stand mixer, preferably fitted with a paddle attachment, or with a hand mixer in a large bowl, beat the butter on medium speed until soft and creamy. Add the sugar and beat for another 3 minutes. Add the eggs one by one, and then the yolk, beating for 1 minute after each addition. Beat in the vanilla; don’t be concerned if the mixture looks curdled. Reduce the mixer speed to low and add the dry ingredients alternately with the buttermilk, adding the dry ingredients in 3 additions and the milk in 2 (begin and end with the dry ingredients); scrape down the sides of the bowl as needed and mix only until the ingredients disappear into the batter. Divide the batter evenly between the two pans and smooth the tops with a rubber spatula.
Bake for 28 to 30 minutes, rotating the pans at the midway point. When fully baked, the cakes will be golden and springy to the touch and a thin knife inserted into the centers will come out clean. Transfer the cakes to a rack and cool for about 5 minutes, then run a knife around the sides of the cakes, unmold them, and peel off the paper liners. Invert and cool to room temperature right-side up.
To make the extract:
Stir the espresso powder and boiling water together in a small cup until blended. Set aside.
To make the syrup:
Stir the water and sugar together in a small saucepan and bring just to a boil. Pour the syrup into a small heatproof bowl and stir in 1 tablespoon of the espresso extract and the liqueur or brandy; set aside.
To make the filling and frosting:
Put the mascarpone, sugar, vanilla, and liqueur in a large bowl and whisk just until blended and smooth.
Working with the stand mixer with the whisk attachment or with a hand mixer, whip the heavy cream until it holds firm peaks. Switch to a rubber spatula and stir about one quarter of the whipped cream into the mascarpone. Fold in the rest of the whipped cream with a light touch.
To assemble the cake:
If the tops of the cake layers have crowned, use a long serrated knife and a gentle sawing motion to even them. Place one layer right-side up on a cardboard round or a cake plate protected with strips of wax or parchment paper. Using a pastry brush or a small spoon, soak the layer with about one third of the espresso syrup. Smooth some of the mascarpone cream over the layer – user about 1 1/4 cups – and gently press the chopped chocolate into the filling. Put the second cake layer on the counter and soak the top of it with half the remaining espresso syrup, then turn the layer over and position it, soaked side down, over the filling. Soak the top of the cake with the remaining syrup.
For the frosting, whisk 1 to 1 1/2 tablespoons of the remaining espresso extract into the remaining mascarpone filling. Taste the frosting as you go to decide how much extract you want to add. If the frosting looks as if it might be a little too soft to spread over the cake, press a piece of plastic wrap against its surface and refrigerate it for 15 minutes or so. Refrigerate the cake too.
With a long metal icing spatula, smooth the frosting around the sides of the cake and over the top. If you want to decorate the cake with chocolate-covered espresso beans, press them into the filling, making concentric circles of beans or just putting some beans in the center of the cake.
Refrigerate the cake for at least 3 hours (or for up to 1 day) before serving – the elements need time to meld.
Just before serving, dust the top of the cake with cocoa. I cut a star shape out of waxed paper and placed it lightly over the cake, and shaved a layer of chocolate over it with a microplane, before carefully removing the star to leave a stenciled shape.

Sanja
I have a really nice recipe for a cannoli cake if you ever decide to make one. I used this at my wedding. My cousin used to work at Sal & Dom’s on Allerton Ave in the Bronx and learned a lot of tricks there.
I’ve had this Dorie recipe earmarked for some time. Yours looks very tempting!
Would you consider it? In all your free time and all?
StickyGooeyCreamyChewy — I know this is terribly *wrong* but I love it when the little cakes are mushy. Ugh, I know. Anyway, these cake layers are not at all–perfect solution for everyone but me. I would love, love, love to take a peek at your cannoli cake recipe. Have you blogged it?
dan — We found it at Whole Foods or a store like that a while ago, but if you can’t find it at a grocery store, I’d try an Italian specialty store. I can’t imagine they wouldn’t have it.
Tartelette — Great minds! And love that you made the cranberry/caramel tart too.
mary — I joked to Alex that I am the only person on earth who could find a tiramisu recipe that required more work than actual tiramisu, what with the baking the cake layers from scratch and a frosting that is slightly different from the filling. I might actually try using lady fingers next time, just to see how it compares.
Jessica — It’s not much of one, but I’ll get to it. It’s part of a Thanksgiving post-mortem entry I deemed too boring to post. Also, our heat wasn’t working on Friday night and I was cranky, thus not able to write anything fun. Hence, the new NaBloPoMo tag (top left) with the “almost” above it. And to think you just asked about pie crust!
Leah, Shelly — Thanks for the encouragement. Alex and I looked into it this morning, and I just don’t think it will be feasible for a few reasons. One, I read a lot of complaints that the printing quality at Lulu.com has gone down significantly this year, and that’s the easiest place to get this done. Two, to use Lulu’s basic shipping and get the calendar by Xmas, one would have to order it by Dec. 12, which is awfully soon! Third, and this is really my biggest concern, although our pictures often look good enough on the Web, because we don’t shoot in RAW, I’m terrifically nervous about their print quality. I hope to start using RAW in the new year, which will allow us to create prints, calendars and what-nots a lot more professional quality.
Jenny — We must be on the same page, as I am too. I created some thumbnail images throughout the sidebar on the left linking to cookies I have created for this site in the past. There are even more in the full Cookie category. Expect to see a lot more in December, too. Yay.
p.s. thanks for considering it and checking into it. that was very sweet of you.
Besides that, I also dropped by to ask if you had any good books, sites, or personal stories to share when it comes to starting a small food business from the confines of ones home?
I say this because I want to be able to bake more often but have the end result go to someone else’s stomach. This is not to say, that I don’t love all things sweet and scrumptious but I’m sure if I ate all of what I’ve baked alone, I would be leaking in buttercream frosting the next day.
I don’t want to retrieve a loan from the bank to open up a bakery, but I do want to get myself out there and let people know that I am capable of making something quite tasty from my tiny kitchen. :)
Your help would be greatly appreciated!
Cheers
Judy
ps – Happy B-day to Jocelyn! It’s nice to finally put a face to the many comments. :)
Anyway, I am back. Let’s get together for Tequila shots soon!
Your recipe looks delicious! It looks like a lot more work though, then his version! hehe I have never had Tiramisu with alcohol in it. I think I would like it with bailys! :O) Hmmm I wonder if you could use Frangelico…?
I would love to show you pics of Franco making me my tiramisu for my last birthday. I will post them on my blog, and you can come take a look if you would like. I will post his recipes too, so you can try my Italian mother in laws recipe! (I have to translate it first!
I love all your delicious things you make! You are so talented!
Ciao!
http://creampuffsinvenice.ca/2008/04/14/leave-the-cannoli-take-the-cake/
(I don’t know how to make pretty links) :(
My cake wasn’t too dense at all. My recipes have a tendency to come out too moist, though. Case in point was the frosting—mine was way too wet. I put it in the fridge for 15 minutes and it was still real wet. I tried for another half hour and still not any better. So I just iced it with wet frosting. It didn’t come out bad, though. I had the consistency of whip cream after it’s been setting out all afternoon.
Next time, though, I’m going to make twice the amount of syrup and twice the amount of filling. The cake needed to be a little more wet throughout for me. And the filling was so thin, it was almost not there.
All in all, this recipe was perfect, though. Many went back for second helpings and everyone who absolutely LOVES Tiramisu, said this was as good as the best they’d ever had.
http://schnuckypuss.livejournal.com/
Thanks so much for blogging about this cake :)
I had to bake the two layers one after another, because I only had one cake pan. It smelled good, but it was rather firm, when I pulled it out. Does this make the cake hard in the same way toasted bread goes stale?
I put the cake on a plate, and started to put the coffee mix on, and while the top started to get soggy, i didn’t drench it all the way through. Should I have?
Then I frosted it and put it in the fridge. I didn’t cover it until about 12 hours later (is this what dried it out?), because it was so late by the time I finished it. Needless to say the frosting was a little darker than when I had started… Overall it took me about 4-6 hours.
So when I went to cut it the following evening, it was pretty hard and dry (as in denser than poundcake). T_T Not as yummy as I was expecting, but it’s probably my own fault. Could you give me pointers for next time? Thanks in advance!
(1) I found the bottom layer to not be sufficiently moist and a bit too dense. I brushed on the coffee syrup on the bottom layer but I got impatient for the top layer so I just poured it on to the top layer. I think pouring worked better because the top layer was super moist.
(2) I missed the slight crunchiness of the ladyfingers on the outside of the cake because I make regular tiramisu in a springform pan with ladyfingers circling the exterior.
These are all minor complaints and I’ll probably make this dessert again, but I may try other tiramisu cake options because I wasn’t blown away (though I think everyone else was so maybe I’m just being too picky).
Do you know how I could adapt this for an 8-inch, 3-layer cake? Would I need to increase the amount of espresso syrup or filling/frosting?
:-)
This cake was super easy to make and the Italians LOVED it. My favorite part of the cake was the dough recipe. It was light and airy, yet moist. It was well-behaved in my oven (which is temperamental) and the flavor was delicious. I’m going to use this batter recipe for other cakes as well. :)
Thank you for your website. It’s my new obsession.
Two things I’d do different next time, more syrup, as everyone seems to concur, and I’d bake it in one pan, with the oven lower, over a longer period of time, and then split the cake, as I find that split cake always soaks up syrup better than two individually baked layers. But very minor details. An awesome cake, love it!